Docker镜像仓库的概念
在Docker生态系统中,Docker镜像仓库(或称为Docker Registry)是一个存储和分发Docker镜像的服务。它类似于其他编程语言中的包管理系统,允许开发者上传、下载和管理Docker镜像。Docker官方提供了一个公共的镜像仓库服务,称为Docker Hub,但你也可以在自己的服务器上运行私有镜像仓库。
Docker仓库的特点
- 存储镜像:Docker镜像仓库用来存储Docker镜像。这些镜像可以是官方提供的,也可以是用户自己创建的。
- 版本控制:每个镜像可以有多个版本(tags),这使得用户可以轻松地回溯到之前的版本或者使用特定的版本。
- 分发:通过镜像仓库,用户可以轻松地共享和分发他们的Docker镜像给其他用户或团队。
- 认证和安全:许多镜像仓库支持基于角色的访问控制(RBAC),允许管理员控制谁可以访问哪些镜像。
Docker镜像仓库分类
Docker镜像仓库主要分为公共镜像仓库和私有镜像仓库。
公共镜像仓库
公共镜像仓库为Docker官方提供,称为Docker Hub,地址:https://hub.docker.com
当然,现在目前各厂商也相继推出了公共的镜像仓库。
目前Docker hub在国内访问不了,需要配置一些代理才能够访问,可以参考下列:- sudo mkdir -p /etc/docker
- sudo tee /etc/docker/daemon.json <<EOF
- {
- "registry-mirrors": [
- "https://docker.1ms.run",
- "https://docker.mybacc.com",
- "https://dytt.online",
- "https://lispy.org",
- "https://docker.xiaogenban1993.com",
- "https://docker.yomansunter.com",
- "https://aicarbon.xyz",
- "https://666860.xyz",
- "https://docker.zhai.cm",
- "https://a.ussh.net",
- "https://hub.littlediary.cn",
- "https://hub.rat.dev",
- "https://docker.m.daocloud.io"
- ]
- }
- EOF
- sudo systemctl daemon-reload
- sudo systemctl restart docker
http://10.0.0.10:5000/v2/_catalog
配置docker准许http访问
docker默认是使用https进行通信的,我们这里配置一下docker使用http访问仓库
示例:如果不配置http访问,推送镜像时会报错- [root@lb ~]# docker pull registry
- Using default tag: latest
- latest: Pulling from library/registry
- f18232174bc9: Pull complete
- e5a9c19e7b9d: Pull complete
- e8a894506e86: Pull complete
- e1822bac1992: Pull complete
- b5da7f963a9e: Pull complete
- Digest: sha256:1fc7de654f2ac1247f0b67e8a459e273b0993be7d2beda1f3f56fbf1001ed3e7
- Status: Downloaded newer image for registry:latest
- docker.io/library/registry:latest
- [root@lb ~]# docker images | grep registry
- registry latest 3dec7d02aaea 2 weeks ago 57.7MB
需要在/etc/docker/daemon.json文件中添加{ "insecure-registries": ["10.0.0.10:5000"] }这行配置,让 Docker 认为该地址是安全的,当然这里的IP也可以换成域名- # 查看需要挂载的存储卷
- [root@lb ~]# docker inspect registry | jq .[].Config.Volumes
- {
- "/var/lib/registry": {}
- }
- # 查看需要映射的端口
- [root@lb ~]# docker inspect registry | jq .[].Config.ExposedPorts
- {
- "5000/tcp": {}
- }
- # 运行容器
- [root@lb ~]# docker run -d --name registry -p 5000:5000 --restart always -v /data/docker/registry:/var/lib/registry registry
- 2e0087e93d0d5070d4d232fdf081bf6be9b6a71f2f72d83ccf01e1a2fb9acfa3
- [root@lb ~]# docker ps -a | grep registry
- 2e0087e93d0d registry "/entrypoint.sh /etc…" 8 seconds ago Up 8 seconds 0.0.0.0:5000->5000/tcp, [::]:5000->5000/tcp registry
- # 给镜像打一个tag
- [root@lb ~]# docker tag mysql:5.7 10.0.0.10:5000/huangsir/mysql:5.7
- # 推送镜像
- [root@lb ~]# docker push 10.0.0.10:5000/huangsir/mysql:5.7
- The push refers to repository [10.0.0.10:5000/huangsir/mysql]
- Get "https://10.0.0.10:5000/v2/": http: server gave HTTP response to HTTPS client
curl http://:5000/v2//tags/list- [root@lb ~]# cat /etc/docker/daemon.json
- {
- "registry-mirrors": [
- ...
- ],
- "insecure-registries": [
- "10.0.0.10:5000"
- ]
- }
- [root@lb ~]# systemctl daemon-reload
- [root@lb ~]# systemctl restart docker
创建一个目录用于存放认证信息,并使用htpasswd命令创建用户名和密码。例如:- [root@lb ~]# docker push 10.0.0.10:5000/huangsir/mysql:5.7
- The push refers to repository [10.0.0.10:5000/huangsir/mysql]
- 441e16cac4fe: Pushed
- 73cb62467b8f: Pushed
- 337ec6bae222: Pushed
- 532b66f4569d: Pushed
- 0d9e9a9ce9e4: Pushed
- 4555572a6bb2: Pushed
- 8527ccd6bd85: Pushed
- d76a5f910f6b: Pushed
- 8b2952eb02aa: Pushed
- 7ff7abf4911b: Pushed
- cff044e18624: Pushed
- 5.7: digest: sha256:4b6c4935195233bc10b617df3cc725a9ddd5a7f10351a7bf573bea0b5ded7649 size: 2618
- [root@lb ~]# curl http://10.0.0.10:5000/v2/_catalog
- {"repositories":["huangsir/mysql"]}
创建容器
- [root@lb ~]# curl http://10.0.0.10:5000/v2/huangsir/mysql/tags/list
- {"name":"huangsir/mysql","tags":["5.7"]}
- [root@lb ~]# mkdir -p /data/docker/auth
- [root@lb ~]# htpasswd -Bbn admin 123456 > /data/docker/auth/htpasswd
- [root@lb ~]# cat /data/docker/auth/htpasswd
- admin:$2y$05$mAp6m7bU5RlQvG808YmRDu6.vgg3q4cMOcCCDZYWkquBqaJrGQtLO
- [root@lb ~]# docker run -d --name registry -p 5000:5000 --restart always \
- -v /data/docker/registry:/var/lib/registry \
- -v /data/docker/auth:/auth \
- -e "REGISTRY_AUTH=htpasswd" \
- -e "REGISTRY_AUTH_HTPASSWD_REALM=Registry Realm" \
- -e "REGISTRY_AUTH_HTPASSWD_PATH=/auth/htpasswd" \
- registry
- b355fdcdb98093ca05d66dd0ddd9246af2e8e81653d8975ed6bcbb7a3fd9b234
- [root@lb ~]# docker ps -a
- CONTAINER ID IMAGE COMMAND CREATED STATUS PORTS NAMES
- b355fdcdb980 registry "/entrypoint.sh /etc…" 4 seconds ago Up 4 seconds 0.0.0.0:5000->5000/tcp, [::]:5000->5000/tcp registry
私有镜像仓库之harbor搭建使用
docker搭建harbor仓库需要Docker compose!!!,需要安装教程的同学可以参考这篇文章:一文搞懂Docker Compose
harbor仓库地址:https://github.com/goharbor/harbor
部署harbor
- # 拉取镜像时提示需要进行验证
- [root@lb ~]# docker pull 10.0.0.10:5000/huangsir/mysql:5.7
- Error response from daemon: Head "http://10.0.0.10:5000/v2/huangsir/mysql/manifests/5.7": no basic auth credentials
- docker login -u admin -p 123456 10.0.0.10:5000
harbor仓库默认使用80端口,需要确保宿主机的80端口没有被占用,或者修改docker-compose.yaml文件,将80端口进行修改- # 下载harbor
- [root@lb ~]# wget https://github.com/goharbor/harbor/releases/download/v2.13.0/harbor-offline-installer-v2.13.0.tgz
- [root@lb ~]# ll harbor-offline-installer-v2.13.0.tgz
- -rw-r--r-- 1 root root 657690441 Apr 20 13:47 harbor-offline-installer-v2.13.0.tgz
- # 解压
- [root@lb ~]# tar -xvf harbor-offline-installer-v2.13.0.tgz
- harbor/harbor.v2.13.0.tar.gz
- harbor/prepare
- harbor/LICENSE
- harbor/install.sh
- harbor/common.sh
- harbor/harbor.yml.tmpl
http://10.0.0.10:80/
或者使用你配置好的域名访问也可以
登录harbor:
用户名:admin
密码:前面我们配置的,123456
使用harbor仓库
docker配置准许harbor仓库进行http访问
需要在/etc/docker/daemon.json文件中添加{ "insecure-registries": ["reg.huangsir.com"] }这行配置,让 Docker 认为该地址是安全的,当然这里的IP也可以换成域名- [root@lb ~/harbor]# cd harbor
- [root@lb ~/harbor]# mv harbor.yml.tmpl harbor.yml
- # 只需修改下面的即可
- [root@lb ~/harbor]# vim harbor.yml
- # 访问域名。这里先随便填写一个域名即可
- hostname: reg.huangsir.com
- ##### 将https相关的内容注释掉
- #https:
- # https port for harbor, default is 443
- #port: 443
- # The path of cert and key files for nginx
- #certificate: /your/certificate/path
- #private_key: /your/private/key/path
- # enable strong ssl ciphers (default: false)
- # strong_ssl_ciphers: false
- ## 修改用户密码
- harbor_admin_password: 123456
- ## 修改挂载的存储卷
- data_volume: /data/harbor/regsitry
- # 先创建存储卷
- [root@lb ~/harbor]# mkdir -p /data/harbor/regsitry
- # 执行安装前置校验脚本,最后输出Successfully即可
- [root@lb ~/harbor]# ./prepare
- ......#省略万字内容
- Successfully called func: create_root_cert
- Generated configuration file: /compose_location/docker-compose.yml
- Clean up the input dir
- # 执行安装,最后输出successfully即可
- [root@lb ~/harbor]# ./install.sh
- .....#省略万字内容
- [+] Running 10/10
- ✔ Network harbor_harbor Created 0.0s
- ✔ Container harbor-log Started 0.3s
- ✔ Container harbor-portal Started 1.4s
- ✔ Container registryctl Started 1.2s
- ✔ Container registry Started 1.4s
- ✔ Container harbor-db Started 1.3s
- ✔ Container redis Started 1.2s
- ✔ Container harbor-core Started 1.7s
- ✔ Container harbor-jobservice Started 2.5s
- ✔ Container nginx Started 2.6s
- ✔ ----Harbor has been installed and started successfully.----
- # 查看镜像运行状况
- [root@lb ~/harbor]# docker-compose ps
- NAME IMAGE COMMAND SERVICE CREATED STATUS PORTS
- harbor-core goharbor/harbor-core:v2.13.0 "/harbor/entrypoint.…" core 55 seconds ago Up 53 seconds (healthy)
- harbor-db goharbor/harbor-db:v2.13.0 "/docker-entrypoint.…" postgresql 55 seconds ago Up 54 seconds (healthy)
- harbor-jobservice goharbor/harbor-jobservice:v2.13.0 "/harbor/entrypoint.…" jobservice 55 seconds ago Up 46 seconds (healthy)
- harbor-log goharbor/harbor-log:v2.13.0 "/bin/sh -c /usr/loc…" log 55 seconds ago Up 54 seconds (healthy) 127.0.0.1:1514->10514/tcp
- harbor-portal goharbor/harbor-portal:v2.13.0 "nginx -g 'daemon of…" portal 55 seconds ago Up 54 seconds (healthy)
- nginx goharbor/nginx-photon:v2.13.0 "nginx -g 'daemon of…" proxy 55 seconds ago Up 53 seconds (healthy) 0.0.0.0:80->8080/tcp, [::]:80->8080/tcp
- redis goharbor/redis-photon:v2.13.0 "redis-server /etc/r…" redis 55 seconds ago Up 54 seconds (healthy)
- registry goharbor/registry-photon:v2.13.0 "/home/harbor/entryp…" registry 55 seconds ago Up 54 seconds (healthy)
- registryctl goharbor/harbor-registryctl:v2.13.0 "/home/harbor/start.…" registryctl 55 seconds ago Up 54 seconds (healthy)
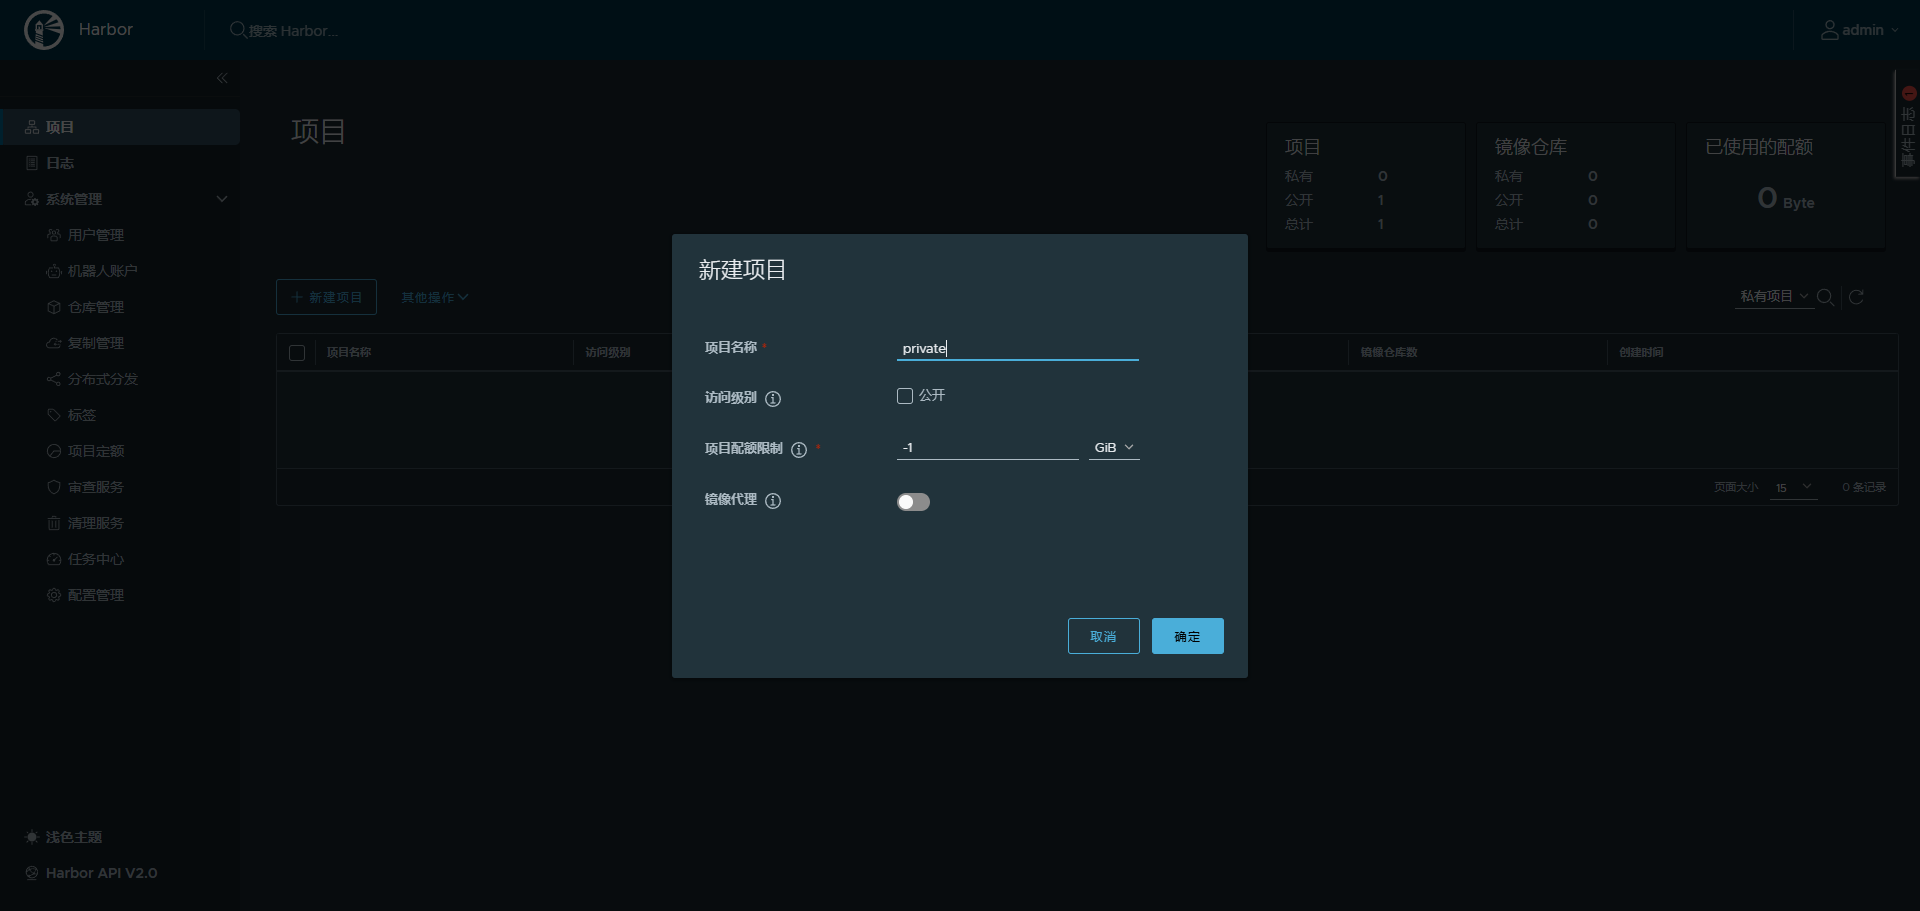
在harbor仓库新建一个项目
推送镜像- [root@lb ~]# cat /etc/docker/daemon.json
- {
- "registry-mirrors": [
- ...
- ],
- "insecure-registries": [
- "10.0.0.10:5000",
- "reg.huangsir.com"
- ]
- }
- [root@lb ~]# systemctl daemon-reload
- [root@lb ~]# systemctl restart docker
harbor仓库配置https访问
修改harbor.yml文件,将https部分放开即可- # 本地做一些hosts解析
- [root@lb ~/harbor]# echo '10.0.0.10 reg.huangsir.com' >> /etc/hosts
- # 登录
- [root@lb ~/harbor]# docker login -u admin -p 123456 reg.huangsir.com
- WARNING! Using --password via the CLI is insecure. Use --password-stdin.
- WARNING! Your credentials are stored unencrypted in '/root/.docker/config.json'.
- Configure a credential helper to remove this warning. See
- https://docs.docker.com/go/credential-store/
- Login Succeeded
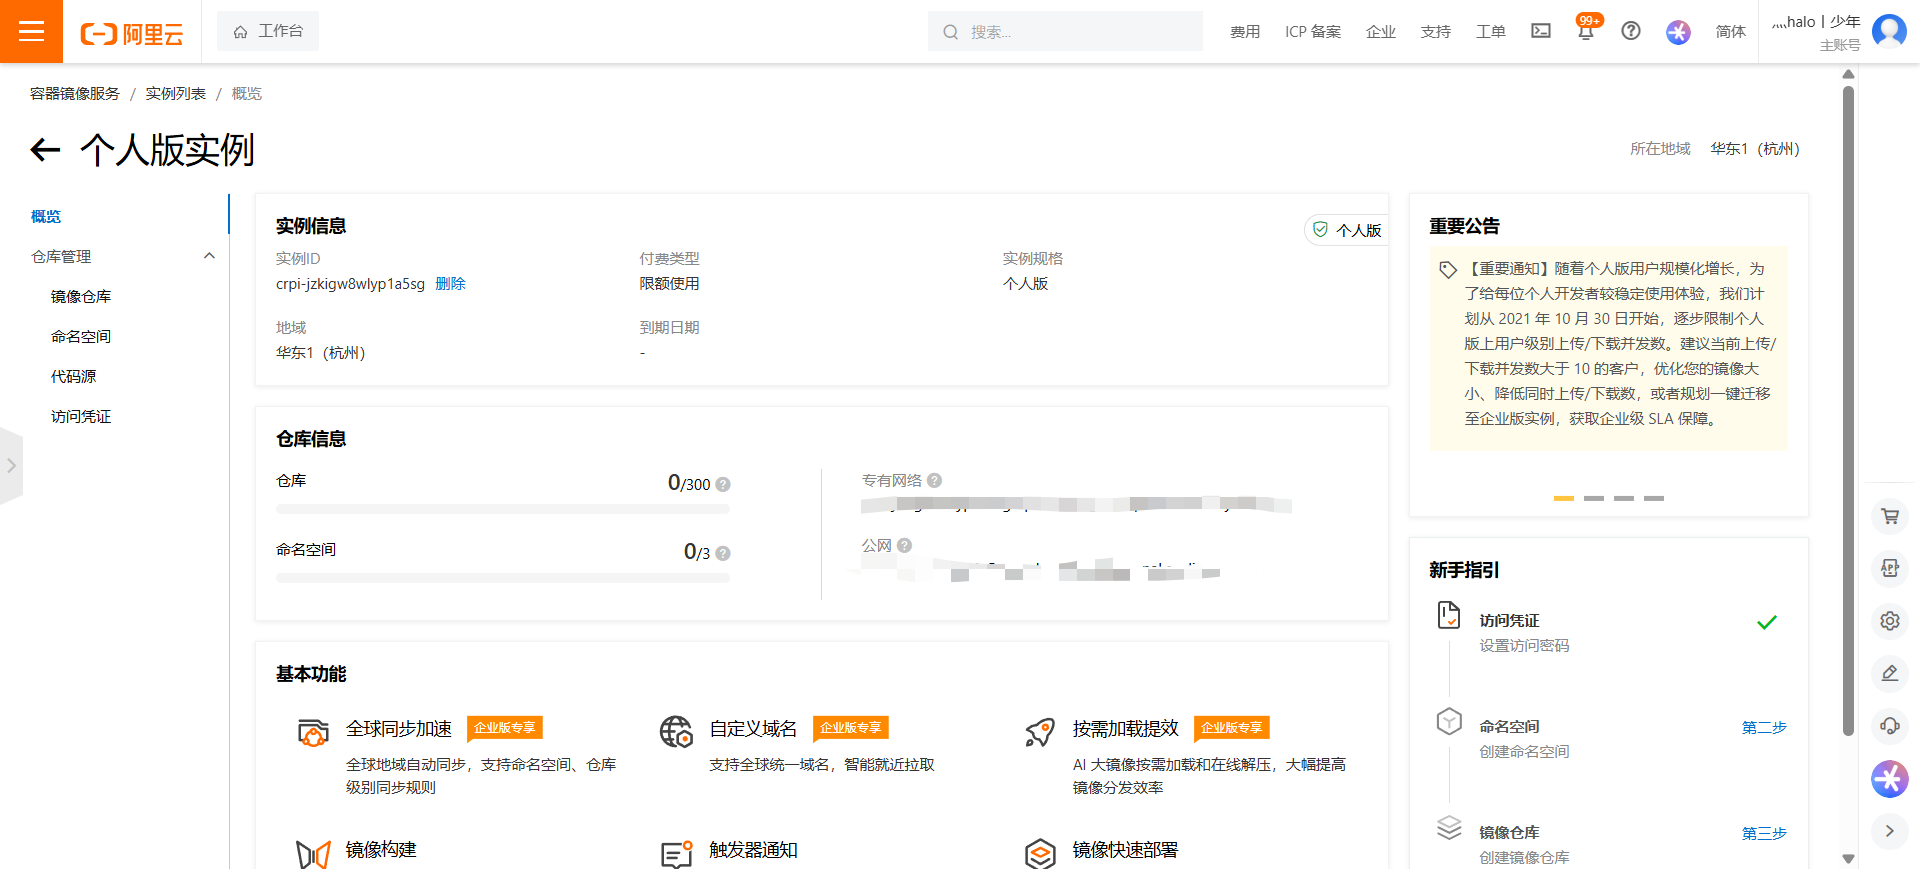
阿里云镜像仓库地址:https://cr.console.aliyun.com/cn-hangzhou/instance/dashboard
阿里云镜像仓库个人版可以面试试用,但是有限制,只有三个命名空间,三百个仓库
登录到阿里云镜像仓库
点击访问凭证即可,我们可以设置固定密码,后续登录就使用改密码进行登录
- # 打标签
- [root@lb ~/harbor]# docker tag mysql:5.7 reg.huangsir.com/private/mysql:5.7
- # 推送镜像
- [root@lb ~/harbor]# docker push reg.huangsir.com/private/mysql:5.7
- The push refers to repository [reg.huangsir.com/private/mysql]
- 441e16cac4fe: Mounted from library/mysql
- 73cb62467b8f: Mounted from library/mysql
- 337ec6bae222: Pushed
- 532b66f4569d: Mounted from library/mysql
- 0d9e9a9ce9e4: Pushed
- 4555572a6bb2: Pushed
- 8527ccd6bd85: Pushed
- d76a5f910f6b: Pushed
- 8b2952eb02aa: Pushed
- 7ff7abf4911b: Pushed
- cff044e18624: Pushed
- 5.7: digest: sha256:4b6c4935195233bc10b617df3cc725a9ddd5a7f10351a7bf573bea0b5ded7649 size: 2618
新建命名空间
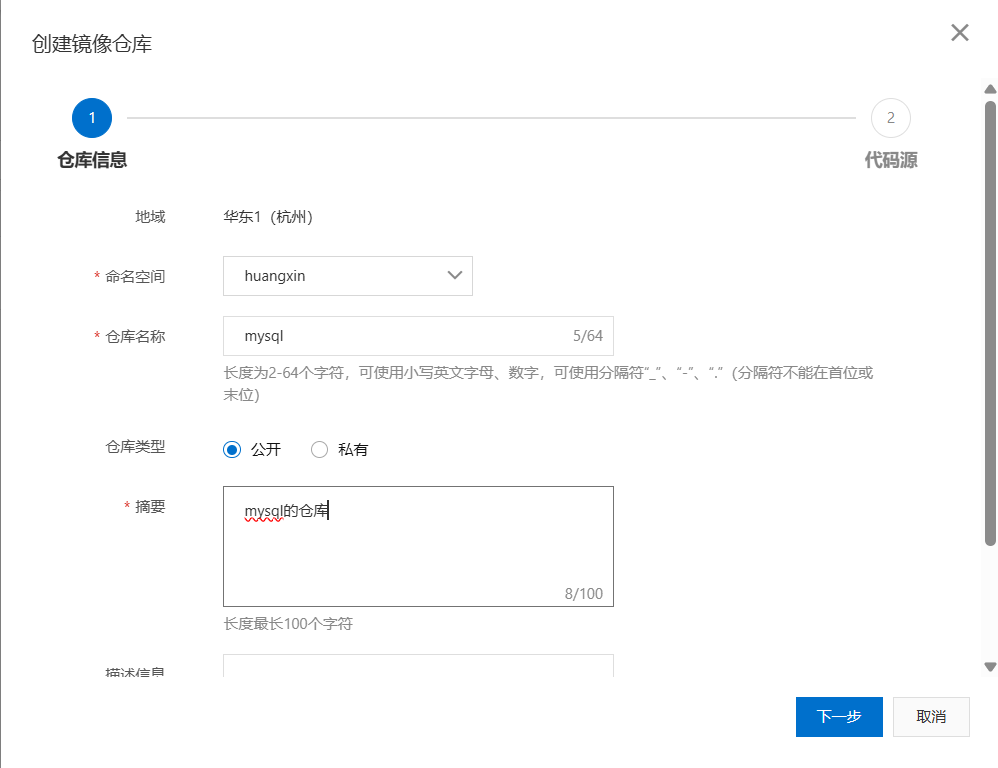
新建镜像仓库
选择本地仓库
duang,我们的镜像仓库就建好了
测试上传镜像
- [root@lb ~/harbor]# vim harbor.yml
- https:
- # https的端口
- port: 443
- # 公钥
- certificate: /your/certificate/path
- # 私钥
- private_key: /your/private/key/path
- # 修改完成之后重启即可
- [root@lb ~/harbor]# docker-compose restart
来源:程序园用户自行投稿发布,如果侵权,请联系站长删除
免责声明:如果侵犯了您的权益,请联系站长,我们会及时删除侵权内容,谢谢合作! |


 提升卡
提升卡 置顶卡
置顶卡 沉默卡
沉默卡 喧嚣卡
喧嚣卡 变色卡
变色卡 千斤顶
千斤顶 照妖镜
照妖镜


